Tuesday, November 8, 2011

Turkish Delight Cupcakes

Full-time work isn't doing much for my rate of blogging, but fear not - the baking continues.

Earlier in the year my friend Nicole and I were discussing how awesome turkish delight cupcakes would surely be, so I decided to make some. I couldn't find a specific recipe, but figured I couldn't go too wrong.

I used my regular vanilla cupcake recipe, but substituted rosewater for the vanilla essence, and added 4-5 chunks of chopped up turkish delight (just the regular kind from the supermarket, with chocolate coating) to each cupcake before baking them.

I really like the look of the chunks baked into the cake. Texture-y.


I made some larger muffin-sized cakes too, utilising my turkish-delight-appropriate pink patty pans.


As good as the cakes looked in their natural state, I still wanted to cover them with sweet rosewater buttercream to make sure the turkish delight flavour won the day. Start by adding just a little rosewater to the buttercream, and keep going until you decide it has reached its highest potential for awesomeness (this doesn't necessarily mean adding very much - but taste it before you slap it onto your cute little cakes!).


I only added a little bit of food colouring to the mix so the colours don't contrast very well (especially in photos), but I was happy with the soft-ish look to go with the very girly flavour.


The vanilla cake carries it off nicely, and the chewy chunks hidden away inside are my favourite part. Having put these together without a lot of thought, I happily conclude that you can't really go wrong with turkish delight cupcakes!

Sunday, October 23, 2011

Brown Sugar Cookies

Any recipe that contains brown sugar and cinnamon immediately grabs my attention.

Also, I'd been on a bit of a "cupcakes and nothing but cupcakes" roll, so I thought some simple cookies were probably in order.


As I reported to a friend, these brown sugar cookies that I found at Joy the Baker's blog (<<< link here) are kind of a lighter, lazier version of snickerdoodles, with the sugar and cinnamon (plus a little ginger) on the inside.

I didn't read the recipe very well and accidentally put in baking powder instead of soda... so then I added a little baking soda as well for good measure (about a teaspoon on top of the original two of powder). This no doubt contributed to their lightness. Next time I'll try the suggested amount and see whether it makes much difference.


Although I expected darker, moister cookies, these were cute and very more-ish. In the future I'd probably make them bigger so people (aka. me) don't feel the need to eat a few at time!

Saturday, October 8, 2011

Banana Bread (gluten & dairy free)

When I decide to make banana cake I don't go to the fruit shop in search of bananas that look like this.


I go in search of bananas that look like THIS. These were only $4.99 a kilo and perfect for baking with so I got nearly a whole kilo and froze some for next time!


This was part of my foray into gluten and dairy-free baking - a banana bread recipe from The Australian Women's Weekly "Gluten-free & Allergy-free Eating." You can find a link to the recipe >>here<<. This one also happens to be wheat, yeast and egg-free!

What DOES it contain? A whole lot of mashed banana and some brown sugar make a lovely start.


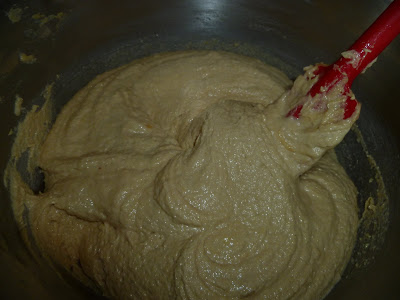
I very nearly forgot to add baking powder, but a final moment of thoughtfulness saved me from a very flat cake. The dark colour of the batter comes from the linseed, sunflower and almond meal (LSA). I didn't even know this stuff existed before, but it's pretty amazing, and I get the impression it might even be good for you.


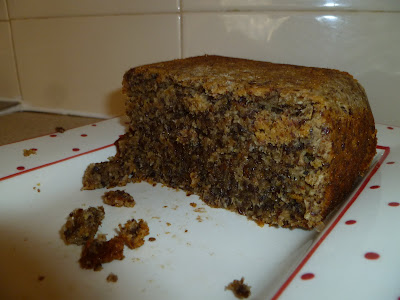
Here's the baked product. It cracked a little when I turned it out, but I was just glad I got that baking powder in at the last minute!


This tasted really good. Very moist from all the banana (yum) and vegetable oil, and the LSA gives it a lot of substance. I would happily serve this up again, even if my guests didn't particularly need to avoid dairy, gluten, wheat, yeast or eggs :)

Wednesday, September 21, 2011

Chocolate Orange Mousse Cake (gluten & dairy free)

I hosted a gluten and dairy-free afternoon tea on the weekend and had fun trying a couple of new new recipes, which both came out really well. This is the first one - a really rich chocolate orange mousse cake from The gluten, wheat & dairy free cookbook by Nicola Graimes.

I used Nuttelex as my dairy-free butter substitute. It's lighter in colour than butter, but it actually tastes pretty good.


This is the cake base, all ready to bake, and already looking pretty appetising.


I used 70% dark Lindt chocolate to make the mousse. It felt a little wrong melting down such nice quality chocolate, but it's the most reliably dairy free chocolate I could source (that isn't just a gross chocolate substitute).


As I was separating my four eggs I was lamenting the fact that I would probably end up throwing the unused portion away. Then I read the recipe properly and found that I would actually be using both parts. Yay! Also, look how orange those yolks are.


Yet another orange ingredient - the rind of two oranges in fact.


Crazy things happen to eggs when you beat them for long enough. It's like magic. Here's before.


And after. Crazy.


After I'd mixed up the mousse and spread it across the cake base I put it in the fridge to set overnight. It probably didn't need that long, but that's how long it got. Here's the finished product, decorated with a sprinkling of extra orange rind.


The verdict from my husband was that this cake tasted like Jaffas. You wouldn't know it didn't have dairy or gluten in it if nobody told you. Unless you were very, very perceptive. What I mean to say is that it was really good.

Wednesday, September 14, 2011

Banana Cupcakes with Cream Cheese Icing

I've had a bag of mashed banana in the freezer for at least a couple of months and decided it was finally time to use it, but it still felt pretty extravagant to make banana cake again when banana prices have been so horrendous for so long.

I used a recipe that my friend Jenn gave me at my hen's high tea before I got married. It's super easy and all done in the food processor. It also happens to taste extremely good.


The plain white, large patty pans I've been using to date are an odd size and tend to crinkle up annoyingly. At the supermarket the other day I came to the delightful realisation that coloured cases are exactly the same price per unit AND it turns out that they're actually the right size for my muffin pan :)


It was my intention to decorate these with cream cheese icing in my usual fashion, but I had friends over and they were of the opinion that bright colours would be better.


I provided the cakes and the icing. They did the decorating.


And I was actually quite impressed by the results!


I usually just use one colour of icing because I figure it cuts down on the cleaning up afterwards, but the extra colour is pretty cool, I must say.


The colours reminded us of the food fight scene in Hook (the Peter Pan movie starring Robin Williams). See the clip here: http://www.youtube.com/watch?v=uPCzjHPS--U


Here's one by Domestic Cowboy.


Banana cake is just as good as I remembered it being, and this time it was also rather pretty :)

Tuesday, September 13, 2011

Another birthday - Ferrero Rocher and more Peanut Butter Cup Cupcakes

My dad's birthday happens to be the day after my husband's so I almost immediately had another chance to make cupcakes. I still had a half a bag of mini peanut butter cups remaining (see previous post) and also a 3/4 full box of Ferrero Rocher chocolates leftover from a dinner party (thanks Steph!). My decision of what to make was made extremely easy by the fact that I had already been eyeing off Willow Bird Baking's dual recipe for Ferrero Rocher and Reese's Cup Cupcakes. I was also keen to see what the cake base was like, as it's vegan - both egg and dairy free.

I'm not always this organised, but decided to get all my ingredients out and ready on the bench. This caused some unexpected amusement. Everything except the vanilla essence was Homebrand!


The cakes came out looking lovely and glossy, which I assume is down to the use of vegetable oil rather than butter.


When the cakes were cooled I hollowed out a hole in each, then filled half with Nutella (generic chocolate hazelnut spread would be fine too) and half with peanut butter cream (the icing leftover from my previous batch of Peanut Butter Cup Cupcakes... but you could also use smooth peanut butter without anything added).


The "Perfectly Chocolate" icing that Julie suggests is beautifully dark and rich. I refrigerated the icing for a couple of hours after making it to give it a chance to firm up, and when I took it out it seemed quite stable... but that didn't last long. Once I started piping it onto the cakes it quickly warmed up from the heat in my hands and got extremely messy!

So let me add to Julie's warning - ice these as quickly as you can, get them straight into the fridge, and keep them in there for at least a couple of hours before serving. I was running low on time so these only had about an hour of cooling time before I transported them. They still tasted great but had a really soft, almost pudding-like consistency. They're much less flimsy if you can refrigerate them longer.


I made some mini cupcakes which I filled and iced, but didn't top with candy. You can see one below that I did top with a mini peanut butter cup (to help identify which mini cakes were peanut butter-filled, as opposed to Nutella-filled) - but I think it's a bit overkill, considering that there's almost as much candy as cake.


I think these are fantastic for a special occasion - a bit fancy - but they would also be delicious (+ more economical & fewer calories) without the chocolate toppers.


It was difficult to get a decent photo because we ate these before they were properly set, but you can at least see that they were lovely and moist - a very chocolatey little creation.


Peanut butter-filled mini cupcake.

These were the surviving cupcakes which went into the fridge and proved how much better the originals would have set, given the proper cooling time. Nevertheless they were a good batch indeed, and I'd be very happy to use the vegan cake base again.

Sunday, September 11, 2011

Peanut Butter Cup Birthday Cupcakes

For my husband's birthday I wanted to make something a bit special. He's a peanut butter cup fan so I had a bit of a search around and found a recipe from Something Shiny for "Dangerously Decadent Cupcakes" (<-- link here) - a rich chocolate cake with creamy peanut butter icing and a mini peanut butter cup baked into the centre. I knew what I had to do!

Armed with my special ingredients (sour cream, heavy cream and a large packet of Reese's mini peanut butter cups!) I embarked on my somewhat messy adventure.


I was surprised that the batter looked so fluffy and light considering the fact that it was all hand-mixed, but I guess that's mostly the influence of the sour cream. I thought these were very cute with the chocolate pressed into the top, all ready for the oven.


Peanut butter cups successfully baked into the centres. I froze the chocolates before use (as suggested in most recipes like this one) but to be honest I don't know if it makes much difference to the end result. You'd have to try using them un-frozen to find out. (Go on, I dare you.)


Time to make the icing, and my bench mixer finally came out. The initial mix of peanut butter, unsalted butter and icing sugar was pretty crumbly, but it became much more icing-like once the cream went in.


With the creamy, peanut buttery icing complete, I set my trusty Wilton 1M star tip to work.


You may notice that I've omitted the chocolate coating that Something Shiny used in the original recipe - I decided that the cupcakes were sufficiently decadent just like this!


I iced these the night before they were to be consumed and was a little concerned about how the cream in the icing would fare, so kept them in the fridge overnight, then took them out a couple of hours before they were to be eaten. They were still slightly cool, which made them nice and firm to bite into.

My only regret was that I didn't make more!